Questo post è nato da uno scambio pacifico di idee. Il soggetto della discussione è l'utilizzo, in una struttura con microservice, del protocollo gRPC. Andando oltre la classica demo del GreeterClient in locale mostrerò due modalità di pubblicazione di un service gRPC e di un client che fa le classiche richieste, naturalmente con l'ultimo Net Core 5. Questo è il mio file proto per la definizione dei metodi e dei parametri utilizzati:
syntax = "proto3";

option csharp_namespace = "AzGrpcService";

package azgrpc;

service MyGrpcService {
    rpc GetMessage (Message) returns (Reply);
}

message Message {
    string Text = 1;
}

message Reply {
    string Id = 1;
    string Text = 2;
    int32 Counter = 3;
}
Il cui codice, in C#:
using Grpc.Core;
using Microsoft.Extensions.Logging;
using System;
using System.Collections.Generic;
using System.Linq;
using System.Threading.Tasks;

namespace AzGrpcService
{
    public class AzService : MyGrpcService.MyGrpcServiceBase
    {
        private readonly ILogger<AzService> _logger;
        private readonly IHelper _helper;

        public AzService(ILogger<AzService> logger, IHelper helper)
        {
            _logger = logger;
            _helper = helper;
        }

        public override Task<Reply> GetMessage(Message request, ServerCallContext context)
        {
            _helper.Counter++;
            return Task.FromResult(new Reply
            {
                Id = _helper.ProcessId,
                Text=request.Text,
                Counter=_helper.Counter
            });
        }
    }
}
Chi ha provato il classico esempio presente nella documentazione ufficiale di Microsoft e ha sviluppato il tutto con Visual Studio, avrà notato che il tutto è semplice, soprattutto la procedura di creazione automatica del certificato SSL per la comunicazione protetta al service creato. Con VsCode la cosa non è molto più complessa perché alla fine basta scrivere da terminale:
dotnet dev-certs https --trust
E per rimuoverlo:
dotnet dev-certs https --clean
Il problema è che questo certificato è valido solo in locale. Ovviamente per rendere pubblico questo service si deve creare un certificato apposito, come nel primo esempio che mostrerò, oppure c'è una seconda opportunità che esporrò in seguito. Effettivamente c'è una terza scelta: fare in modo che il service non usi il certificato e che le connessioni tra lui e il client siano in chiaro (potrebbe essere accettabile in una intranet, ma non è così che si fa!
Avendo già un cluster Kubernetes avviato come primo passaggio si deve creare il certificato. Di seguito la procedura l'ho eseguita con openssl con una macchina Linux, ma la cosa dovrebbe essere simile anche sotto Windows. Questo certificato NON essendo rilasciato da una CA ufficiale ovviamente avrà dei problemi di riconoscimento da parte del client, ma la soluzione è semplice. Innanzitutto creerò un file che sarà utilizzato da openssl per creare il certificato. Eccolo:
[ req ]
default_bits = 2048
prompt = no
default_md = sha256
req_extensions = req_ext
distinguished_name = dn

[ dn ]
C = IT
ST = IT
L = MILAN
O = LOCAL
OU = LOCAL
CN = webserver.default.svc.cluster.local

[ req_ext ]
subjectAltName = @alt_names

[ alt_names ]
DNS.1 = webserver
DNS.2 = webserver.default
DNS.3 = webserver.default.svc
DNS.4 = webserver.default.svc.cluster
DNS.5 = webserver.default.svc.cluster.local

[ v3_ext ]
authorityKeyIdentifier=keyid,issuer:always
basicConstraints=CA:FALSE
keyUsage=keyEncipherment,dataEncipherment
extendedKeyUsage=serverAuth,clientAuth
subjectAltName=@alt_names
Ho specificato con CN e, soprattutto, come DNS webserver webserver.default.svc.cluster.local perché sarà il domain name del service all'interno di Kubernetes. Le varianti specificate (DNS.1, DNS.2... serve per renderlo disponibile da qualsiasi punto all'interno del cluster). E' arrivato ora il momento di creare i certificati. Da terminale creo il ca.key:
openssl genrsa -out ca.key 2048
Quindi il ca.crt:
openssl req -x509 -new -nodes -key ca.key -subj "/CN=webserver.default.svc.cluster.local" -days 10000 -out ca.crt
Ora creo la server.key sempre a 2048 bit:
openssl genrsa -out server.key 2048
E con quest'ultima key e il file creato prima per la definizione del certificato creo il certificato firmato (server.csr):
openssl req -new -key server.key -out server.csr -config csr.conf
Ultimi due passaggi, creazione del certificato x509:
openssl x509 -req -in server.csr -CA ca.crt -CAkey ca.key -CAcreateserial -out server.crt -days 10000 -extensions v3_ext -extfile csr.conf
Per poter essere utilizzato all'interno della web application ho bisogno di convertirlo in formato pfx:
openssl pkcs12 -export -out domain.name.pfx -inkey server.key -in server.crt
Ora ho tutti i file di cui ho bisogno:
- domain.name.pfx
- ca.crt
domain.name.pfx lo userò per la web application visto che non posso usare quello creato con il comando dotnet. Senza questo certificato si ottiene l'errore:
crit: Microsoft.AspNetCore.Server.Kestrel[0]
      Unable to start Kestrel.
      System.InvalidOperationException: Unable to configure HTTPS
endpoint. No server certificate was specified, and the default
developer certificate could not be found or is out of date.
      To generate a developer certificate run 'dotnet dev-certs
https'. To trust the certificate (Windows and macOS only) run 'dotnet
dev-certs https --trust'.
      For more information on configuring HTTPS see
https://go.microsoft.com/fwlink/?linkid=848054.
Per utilizzare questo file pfx è necessario modificare il metodo CreateHostBuilder con questo codice semplificato:
    public static IHostBuilder CreateHostBuilder(string[] args)
  {
    return Host.CreateDefaultBuilder(args)
              .ConfigureWebHostDefaults(webBuilder =>
              {
                  webBuilder.UseKestrel(options =>
                  {
                      options.Listen(IPAddress.Any, 443, listenOptions =>
          {
                          var serverCertificate = LoadCertificate();
                          listenOptions.UseHttps(serverCertificate);
          });
                  });

                  webBuilder.UseStartup<Startup>();
              });
  }

  private static X509Certificate2 LoadCertificate()
  {
      string certificatePfx = "domain.name.pfx";
      byte[] certificatePayload = File.ReadAllBytes(certificatePfx);
      return new X509Certificate2(certificatePayload, "123456");
  }
Grazie agli oggetti come i secrets e i configmap posso inserirlo direttamente con Kuberbenetes. Quasi tutto risolto, ma questo certificato ritornerà un errore dal client perché non rilasciato da un CA. Per risolvere velocemente ci sono tre strade semplici: il primo è inserire sulle macchine worker di Kurbenetes questi certificati come se fosse rilasciati da una CA (è sufficiente un comando), oppure, se come nella maggior parte dei casi non è possibile mettere mano direttamente a queste macchine, si possono inserire direttamente in Docker e lasciare che lui esegua tutta la procedura, infine, utilizzando questo esempio Kurbenetes, posso lasciarlo fare a lui nella definizione dei pod (io userò questa strada). Questa strada mi permette di inserire i due file per i certificati negli oggetti Secrets o ConfigMap e collegarli ai pod dove gireranno i miei due progetti. Inizio proprio con questo punto:
kubectl create secret generic certificate-webserver --from-file=./ca.crt --from-file=./domain.name.pfx
E' il momento di avviare il service all'interno di Kubernetes:
---
apiVersion: v1
kind: Service
metadata:
  name: webserver
  annotations:
spec:
  selector:
    app: webserver
  ports:
  - protocol: TCP
    port: 443
    targetPort: 443
---
apiVersion: apps/v1
kind: Deployment
metadata:
  name: webserver
  labels:
    app: webserver
spec:
  replicas: 1
  selector:
    matchLabels:
      app: webserver
  template:
    metadata:
      labels:
        app: webserver
    spec:
      containers:
      - name: webserver
        image: sbraer/grpcservice:v1
        imagePullPolicy: IfNotPresent
        env:
        - name: USE_CERTIFICATE
          value: "true"
        - name: CERTIFICATE_PFX_FILE
          value: /usr/local/share/ca-certificates/domain.name.pfx
        - name: PORT
          value: "443"
        command:
        - bash
        - "-c"
        - |
          set ex
          chmod 644 /usr/local/share/ca-certificates/ca.crt
          update-ca-certificates
          dotnet AzGrpcService.dll
        volumeMounts:
        - name: certificates
          mountPath: /usr/local/share/ca-certificates
      volumes:
      - name: certificates
        secret:
          secretName: certificate-webserver
In command ho inserito il codice per memorizzare il certificato e avviare la mia web application (tralascio la descrizione del codice della dichiarazione dei Volume perché già spiegato più volte nei post precedenti. Ora controllo che il client e il service stiano comunicando:
kubectl get po
Per sapere l'id del pod client, quindi controllo il log:
$ kubectl logs webclient-ecf9271041-424c7 -f
From service: a1cfe880-768a-4e7b-b9e2-b1ded76e840e Message 1 1
From service: a1cfe880-768a-4e7b-b9e2-b1ded76e840e Message 2 2
From service: a1cfe880-768a-4e7b-b9e2-b1ded76e840e Message 3 3
From service: a1cfe880-768a-4e7b-b9e2-b1ded76e840e Message 4 4
From service: a1cfe880-768a-4e7b-b9e2-b1ded76e840e Message 5 5
Il parametro -f fa in modo che il comando log non si chiuda dopo aver visualizzato il log ma continui a rimanere collegato in attesa di altri messaggi.
Perfetto, prima soluzione funziona. Critiche a questo metodo: è necessario inserire uno o più certificati a mano in tutti i pod che effettueranno le richieste. Questo potrebbe essere anche una cosa positiva, perché si preclude la possibilità che un pod possa comunicare per errore con uno non autorizzato. Ma il difetto più grande è il rinnovo del certificato. Io solo per test ho creato un certificato sopra dalla durata di 10.000 giorni (27 anni), ma in casi normali un certificato anche rilasciato da una CA ha una scadenza molto più breve, e in quel caso ci si deve ricordare di aggiornare il file in Kubernetes, quindi aggiornare tutti i pod coinvolti. A questo c'è una soluzione alternativa nativa all'interno di Kubernetes che permette di creare certificati con l'aggiornamento automatico, ma non posso dire di più perché non ho mai provato questa funzionalità.
Seconda opzione, non usare i certificati, anzi, per meglio dire, fare in modo che la connessione tra i servizi e tutta la gestione dei certificati venga gestita in automatico da terzi grazie al service mesh. Il service mesh è una servizio che permette di agganciare ai pod interessati un proxy che gestirà lui le connesioni tra pod aggiungendo interessanti funzionalità, tra le quali la connessione con certificato TLS e il controllo preciso delle connessioni.
I più noti service mesh sono:
Istio è sicuramente il più famoso e con più opzioni. AWS App Mesh è utilizzabile nel cloud AWS ma non avendo alcuna esperienza diretta non mi spingerò a dare giudizi e lo tralascerò completamente, così come Consul Connect (Consul lo conosco per altre peculiarità come avevo scritto in un post di qualche anno fa). Nel mio caso userò Linkerd che preferisco per semplicità di utilizzo. Ma come funziona un service mesh, in questo caso Linkerd? Il bello di questi strumenti è che mettono a disposizione il tutto senza alcuna modifica al nostro codice se non una riga aggiuntiva nei file yaml di configurazione: al resto pensa tutto lui. Nel mio caso sono presenti due pod - il service e il client - al quale Linkerd inserirà in modo automatico un proxy alle connessioni. Ma prima di vedere come, è ora di semplificare il codice usato finora. Come visto prima ho inserito nel service il caricamento del certificato pfx. Ora non mi serve più. Anzi, non mi serve utilizzare connessioni cifrate: posso utilizzare le chiamate in chiaro, e per fare questo, seguendo la documentazione, scriverò:
      int port = int.Parse(Environment.GetEnvironmentVariable("PORT") ?? "5001");

    return Host.CreateDefaultBuilder(args)
              .ConfigureWebHostDefaults(webBuilder =>
              {
                  webBuilder.UseKestrel(options =>
                  {
                      options.Listen(IPAddress.Any, port, listenOptions =>
                      {
                        listenOptions.Protocols = HttpProtocols.Http2;
                      });
                  });

                  webBuilder.UseStartup<Startup>();
              });
Ora se avvio in locale questa applicazione non avrò bisogno di certificati o altro, e anche il client si potrà connettere con il protocollo http. Il codice del client non subirà alcune modifica visto che passerò il link da chiamare con una environment variable. Fine. Cancellato quanto fatto in precedenza in Kubernetes (con violenza kubectl delete all --all) ricreo il tutto con i file yaml che saranno più semplici visto che non utilizzerò alcun certificato:
$ kubectl apply -f server_without_certificate.yaml
$ kubectl apply -f client_without_certificate.yaml
$ kubectl get po
NAME                         READY   STATUS    RESTARTS   AGE
webclient-79c8465574-78djm   1/1     Running   0          3s
webserver-779f8cccdf-fhchd   1/1     Running   0          64s
$ kubectl logs webclient-79c8465574-78djm
From service: 094a4627-4d53-4492-868b-a1fe0df9773f Message 1 1
From service: 094a4627-4d53-4492-868b-a1fe0df9773f Message 2 2
From service: 094a4627-4d53-4492-868b-a1fe0df9773f Message 3 3
From service: 094a4627-4d53-4492-868b-a1fe0df9773f Message 4 4
From service: 094a4627-4d53-4492-868b-a1fe0df9773f Message 5 5
From service: 094a4627-4d53-4492-868b-a1fe0df9773f Message 6 6
From service: 094a4627-4d53-4492-868b-a1fe0df9773f Message 7 7
From service: 094a4627-4d53-4492-868b-a1fe0df9773f Message 8 8
From service: 094a4627-4d53-4492-868b-a1fe0df9773f Message 9 9
...
Funziona, ma la connessione tra i due pod è in chiaro. Ci si potrebbe accontentare di questo visto che tutto funziona. Ma ora è il momento di Linkerd. Innanzitutto lo si deve installare. Sul sito è presente una guida semplicissima:
https://linkerd.io/2/getting-started/
Una volta seguiti pedissequamente i passaggi si può verificare che tutto funzioni:
linkerd check
Oppure:
$ kubectl get -n linkerd po
NAME                                      READY   STATUS         RESTARTS   AGE
linkerd-controller-59ff7845-g6jj7         0/2     NodeAffinity   0          6d12h
linkerd-controller-59ff7845-phjk2         2/2     Running        9          5d1h
linkerd-destination-764bd6fb75-fmzn6      0/2     NodeAffinity   0          5d1h
linkerd-destination-764bd6fb75-gdc92      2/2     Running        4          3d1h
linkerd-destination-764bd6fb75-lv99p      0/2     NodeAffinity   0          6d12h
linkerd-grafana-8b8cd7f8c-cpq8p           0/2     NodeAffinity   0          6d12h
linkerd-grafana-8b8cd7f8c-g5kpf           2/2     Running        6          5d1h
linkerd-identity-689dc7c694-jnbb6         0/2     NodeAffinity   0          6d12h
linkerd-identity-689dc7c694-vd8qm         2/2     Running        9          5d1h
linkerd-prometheus-c5567d5f-j7c2k         0/2     NodeAffinity   0          6d12h
linkerd-prometheus-c5567d5f-vc7vx         2/2     Running        6          5d1h
linkerd-proxy-injector-67b4c6678b-5kfvf   0/2     NodeAffinity   0          6d12h
linkerd-proxy-injector-67b4c6678b-zdmgz   2/2     Running        9          5d1h
linkerd-sp-validator-c8fd55bd6-8rqbd      2/2     Running        9          5d1h
linkerd-sp-validator-c8fd55bd6-bmtxk      0/2     NodeAffinity   0          6d12h
linkerd-tap-5778ddd878-k7jj5              2/2     Running        9          5d1h
linkerd-tap-5778ddd878-rkfmm              0/2     NodeAffinity   0          6d12h
linkerd-web-645876c58-cm5dg               2/2     Running        9          5d1h
linkerd-web-645876c58-sq9dc               0/2     NodeAffinity   0          6d12h
Il bello è che si può lasciare il tutto a lui per inserire il suo proxy nei pod avviati come da documentazione:
kubectl get -n default deploy -o yaml | linkerd inject - | kubectl apply -f -
Esaminando l'output si nota che ha aggiunto, negli oggetti di tipo Deployment, nelle Annotation una nuova voce linkerd.io/inject: enabled:
apiVersion: apps/v1
  kind: Deployment
  metadata:
    name: webserver
    labels:
      app: webserver
  spec:
    replicas: 1
    selector:
      matchLabels:
        app: webserver
    template:
      metadata:
        labels:
          app: webserver
        annotations:
          linkerd.io/inject: enabled
...
La stessa cosa per il service usato dal server:
apiVersion: v1
kind: Service
metadata:
  name: webserver
  annotations:
    linkerd.io/inject: enabled
spec:
  selector:
    app: webserver
  ports:
  - protocol: TCP
    port: 80
    targetPort: 80
Ora provo ad avviare il service con questa modifica:
$ kubectl apply -f server_with_linkerd.yaml
service/webserver created
deployment.apps/webserver created
$ kubectl get po
NAME                        READY   STATUS    RESTARTS   AGE
webserver-6b48fbfd5-jntzk   2/2     Running   0          26s
Sì può notare ora che i pod avviati ora per il service sono due e non più uno come in precedenza. Questo è merito di Linkerd che ha creato un pod contenente il proxy che svolgerà il lavoro di connessione. Solo per curiosità posso controllare con log cosa sta succedendo:
$ kubectl logs webserver-6b48fbfd5-jntzk
  error: a container name must be specified for pod webserver-6b48fbfd5-jntzk, choose one of: [webserver linkerd-proxy] or one of the init containers: [linkerd-init]
E' stato avviato un pod come init e insieme al mio service c'è il proxy di linkerd. In init:
$ kubectl logs webserver-6b48fbfd5-jntzk linkerd-init
  2020/12/26 20:47:02 Tracing this script execution as [1609015622]
  2020/12/26 20:47:02 current state
  ------------------------------------------------------------
  2020/12/26 20:47:02 :; iptables-save
  2020/12/26 20:47:02

  2020/12/26 20:47:02 configuration
  ------------------------------------------------------------
  2020/12/26 20:47:02 Will ignore port [4190 4191 25 443 587 3306 11211] on chain PROXY_INIT_REDIRECT
  2020/12/26 20:47:02 Will redirect all INPUT ports to proxy
  2020/12/26 20:47:02 Ignoring uid 2102
  2020/12/26 20:47:02 Will ignore port [25 443 587 3306 11211] on chain PROXY_INIT_OUTPUT
  2020/12/26 20:47:02 Redirecting all OUTPUT to 4140
  2020/12/26 20:47:02

  2020/12/26 20:47:02 adding rules
  ------------------------------------------------------------
  2020/12/26 20:47:02 :; iptables -t nat -N PROXY_INIT_REDIRECT -m comment --comment proxy-init/redirect-common-chain/1609015622
  2020/12/26 20:47:02 :; iptables -t nat -A PROXY_INIT_REDIRECT -p tcp --match multiport --dports 4190,4191,25,443,587,3306,11211 -j RETURN -m comment --comment proxy-init/ignore-port-4190,4191,25,443,587,3306,11211/1609015622
  2020/12/26 20:47:02 :; iptables -t nat -A PROXY_INIT_REDIRECT -p tcp -j REDIRECT --to-port 4143 -m comment --comment proxy-init/redirect-all-incoming-to-proxy-port/1609015622
  2020/12/26 20:47:02 :; iptables -t nat -A PREROUTING -j PROXY_INIT_REDIRECT -m comment --comment proxy-init/install-proxy-init-prerouting/1609015622
  2020/12/26 20:47:02 :; iptables -t nat -N PROXY_INIT_OUTPUT -m comment --comment proxy-init/redirect-common-chain/1609015622
  2020/12/26 20:47:02 :; iptables -t nat -A PROXY_INIT_OUTPUT -m owner --uid-owner 2102 -o lo ! -d 127.0.0.1/32 -j PROXY_INIT_REDIRECT -m comment --comment proxy-init/redirect-non-loopback-local-traffic/1609015622
  2020/12/26 20:47:02 :; iptables -t nat -A PROXY_INIT_OUTPUT -m owner --uid-owner 2102 -j RETURN -m comment --comment proxy-init/ignore-proxy-user-id/1609015622
  2020/12/26 20:47:03 :; iptables -t nat -A PROXY_INIT_OUTPUT -o lo -j RETURN -m comment --comment proxy-init/ignore-loopback/1609015622
  2020/12/26 20:47:03 :; iptables -t nat -A PROXY_INIT_OUTPUT -p tcp --match multiport --dports 25,443,587,3306,11211 -j RETURN -m comment --comment proxy-init/ignore-port-25,443,587,3306,11211/1609015622
  2020/12/26 20:47:03 :; iptables -t nat -A PROXY_INIT_OUTPUT -p tcp -j REDIRECT --to-port 4140 -m comment --comment proxy-init/redirect-all-outgoing-to-proxy-port/1609015622
  2020/12/26 20:47:03 :; iptables -t nat -A OUTPUT -j PROXY_INIT_OUTPUT -m comment --comment proxy-init/install-proxy-init-output/1609015622
  2020/12/26 20:47:03

  2020/12/26 20:47:03 end state
  ------------------------------------------------------------
  2020/12/26 20:47:03 :; iptables-save
  2020/12/26 20:47:03 # Generated by iptables-save v1.8.2 on Sat Dec 26 20:47:03 2020
  *nat
  :PREROUTING ACCEPT [0:0]
  :INPUT ACCEPT [0:0]
  :OUTPUT ACCEPT [0:0]
  :POSTROUTING ACCEPT [0:0]
  :PROXY_INIT_OUTPUT - [0:0]
  :PROXY_INIT_REDIRECT - [0:0]
  -A PREROUTING -m comment --comment "proxy-init/install-proxy-init-prerouting/1609015622" -j PROXY_INIT_REDIRECT
  -A OUTPUT -m comment --comment "proxy-init/install-proxy-init-output/1609015622" -j PROXY_INIT_OUTPUT
  -A PROXY_INIT_OUTPUT ! -d 127.0.0.1/32 -o lo -m owner --uid-owner 2102 -m comment --comment "proxy-init/redirect-non-loopback-local-traffic/1609015622" -j PROXY_INIT_REDIRECT
  -A PROXY_INIT_OUTPUT -m owner --uid-owner 2102 -m comment --comment "proxy-init/ignore-proxy-user-id/1609015622" -j RETURN
  -A PROXY_INIT_OUTPUT -o lo -m comment --comment "proxy-init/ignore-loopback/1609015622" -j RETURN
  -A PROXY_INIT_OUTPUT -p tcp -m multiport --dports 25,443,587,3306,11211 -m comment --comment "proxy-init/ignore-port-25,443,587,3306,11211/1609015622" -j RETURN
  -A PROXY_INIT_OUTPUT -p tcp -m comment --comment "proxy-init/redirect-all-outgoing-to-proxy-port/1609015622" -j REDIRECT --to-ports 4140
  -A PROXY_INIT_REDIRECT -p tcp -m multiport --dports 4190,4191,25,443,587,3306,11211 -m comment --comment "proxy-init/ignore-port-4190,4191,25,443,587,3306,11211/1609015622" -j RETURN
  -A PROXY_INIT_REDIRECT -p tcp -m comment --comment "proxy-init/redirect-all-incoming-to-proxy-port/1609015622" -j REDIRECT --to-ports 4143
  COMMIT
  # Completed on Sat Dec 26 20:47:03 2020

  2020/12/26 20:47:03
I più grossi cambiamente sono al firewall. Ora controllo il proxy:
$ kubectl logs webserver-6b48fbfd5-jntzk linkerd-proxy
  time="2020-12-26T20:47:04Z" level=info msg="running version stable-2.9.1"
  [     0.001074s]  INFO ThreadId(01) linkerd2_proxy::rt: Using single-threaded proxy runtime
  [     0.001849s]  INFO ThreadId(01) linkerd2_proxy: Admin interface on 0.0.0.0:4191
  [     0.001989s]  INFO ThreadId(01) linkerd2_proxy: Inbound interface on 0.0.0.0:4143
  [     0.002001s]  INFO ThreadId(01) linkerd2_proxy: Outbound interface on 127.0.0.1:4140
  [     0.002006s]  INFO ThreadId(01) linkerd2_proxy: Tap interface on 0.0.0.0:4190
  [     0.002010s]  INFO ThreadId(01) linkerd2_proxy: Local identity is default.default.serviceaccount.identity.linkerd.cluster.local
  [     0.002019s]  INFO ThreadId(01) linkerd2_proxy: Identity verified via linkerd-identity-headless.linkerd.svc.cluster.local:8080 (linkerd-identity.linkerd.serviceaccount.identity.linkerd.cluster.local)
  [     0.002024s]  INFO ThreadId(01) linkerd2_proxy: Destinations resolved via linkerd-dst-headless.linkerd.svc.cluster.local:8086 (linkerd-destination.linkerd.serviceaccount.identity.linkerd.cluster.local)
  [     0.002356s]  INFO ThreadId(01) outbound: linkerd2_app: listen.addr=127.0.0.1:4140 ingress_mode=false
  [     0.002495s]  INFO ThreadId(01) inbound: linkerd2_app: listen.addr=0.0.0.0:4143
  [     0.058478s]  INFO ThreadId(02) daemon:identity: linkerd2_app: Certified identity: default.default.serviceaccount.identity.linkerd.cluster.local
E il mio service?
$ kubectl logs webserver-6b48fbfd5-jntzk webserver
  warn: Microsoft.AspNetCore.Server.Kestrel[0]
        Overriding address(es) 'http://+:5000, https://+:5001'. Binding to endpoints defined in UseKestrel() instead.
  info: Microsoft.Hosting.Lifetime[0]
        Now listening on: http://0.0.0.0:80
  info: Microsoft.Hosting.Lifetime[0]
        Application started. Press Ctrl+C to shut down.
  info: Microsoft.Hosting.Lifetime[0]
        Hosting environment: Production
  info: Microsoft.Hosting.Lifetime[0]
        Content root path: /app
E' il momento del client:
apiVersion: apps/v1
kind: Deployment
metadata:
  name: webclient
  labels:
    app: webclient
spec:
  replicas: 1
  selector:
    matchLabels:
      app: webclient
  template:
    metadata:
      labels:
        app: webclient
      annotations:
        linkerd.io/inject: enabled
    spec:
      containers:
      - name: webclient
        image: sbraer/grpcclient:v1
        imagePullPolicy: IfNotPresent
        env:
        - name: SERVER_NAME
          value: "http://webserver.default.svc.cluster.local"
Anche qui linkerd.io/inject: enabled. Lo avvio:
$ kubectl apply -f client_with_linkerd.yaml
deployment.apps/webclient created
$ kubectl get po
NAME                         READY   STATUS    RESTARTS   AGE
webclient-6f65f8d9c9-4pdb    2/2     Running   0          21s
webserver-6b48fbfd5-jntzk    2/2     Running   0          14m
Anche in questo caso i pod sono diventati due. Questa volta non andrò nei dettagli. Voglio solo vedere se funziona:
$ kubectl logs webclient-6f65f8d9c9-4pdb9
error: a container name must be specified for pod webclient-6f65f8d9c9-4pdb9, choose one of: [webclient linkerd-proxy] or one of the init containers: [linkerd-init]
$ kubectl logs webclient-6f65f8d9c9-4pdb9 webclient
From service: 8f8f9962-b246-4ec2-8b90-eb1f4e7d5fa7 Message 1 1
From service: 8f8f9962-b246-4ec2-8b90-eb1f4e7d5fa7 Message 2 2
From service: 8f8f9962-b246-4ec2-8b90-eb1f4e7d5fa7 Message 3 3
From service: 8f8f9962-b246-4ec2-8b90-eb1f4e7d5fa7 Message 4 4
From service: 8f8f9962-b246-4ec2-8b90-eb1f4e7d5fa7 Message 5 5
From service: 8f8f9962-b246-4ec2-8b90-eb1f4e7d5fa7 Message 6 6
...
Funziona. Ma la connessione è protetta?
$ linkerd tap deployment/webclient --namespace default --to deployment/webserver   --to-namespace default --path /azgrpc.MyGrpcService/GetMessage
req id=2:0 proxy=out src=172.17.0.14:50250 dst=172.17.0.13:80 tls=true :method=POST :authority=webserver :path=/azgrpc.MyGrpcService/GetMessage
rsp id=2:0 proxy=out src=172.17.0.14:50250 dst=172.17.0.13:80 tls=true :status=200 latency=2396µs
end id=2:0 proxy=out src=172.17.0.14:50250 dst=172.17.0.13:80 tls=true grpc-status=OK duration=81µs response-length=59B
req id=2:1 proxy=out src=172.17.0.14:50260 dst=172.17.0.13:80 tls=true :method=POST :authority=webserver :path=/azgrpc.MyGrpcService/GetMessage
rsp id=2:1 proxy=out src=172.17.0.14:50260 dst=172.17.0.13:80 tls=true :status=200 latency=1455µs
end id=2:1 proxy=out src=172.17.0.14:50260 dst=172.17.0.13:80 tls=true grpc-status=OK duration=42µs response-length=59B
req id=2:2 proxy=out src=172.17.0.14:50268 dst=172.17.0.13:80 tls=true :method=POST :authority=webserver :path=/azgrpc.MyGrpcService/GetMessage
rsp id=2:2 proxy=out src=172.17.0.14:50268 dst=172.17.0.13:80 tls=true :status=200 latency=3118µs
end id=2:2 proxy=out src=172.17.0.14:50268 dst=172.17.0.13:80 tls=true grpc-status=OK duration=119µs response-length=59B
req id=2:3 proxy=out src=172.17.0.14:50274 dst=172.17.0.13:80 tls=true :method=POST :authority=webserver :path=/azgrpc.MyGrpcService/GetMessage
Il comando linkerd tap mostra le connessioni attive, qui sopra ho aggiunto il filtro per la connessione di mio interesse, altrimenti potevo vedere tutte le connessioni gestite da Linkerd con il comando generico, e più facile da ricordare, linkerd -n default tap deploy. Qui sopra, nelle risposte, è possibile vedere informazioni su tutte le connessioni gRPC del mio service, ed è presente la colonna tls=true che mi informa che la connessione è protetta.
Problema risolto. Codice più semplice sia a livello di software scritto, sia nella configurazione dei certificati all'interno di Kubernetes. Inoltre, in questo caso, i certificati si aggiornano senza nessun intervento umano. Un ultimo dettaglio molto interessante è la console che offre Linkerd. Da terminale, per lanciarla, si usa il comando:
linkerd dashboard
Che aprirà il browser:
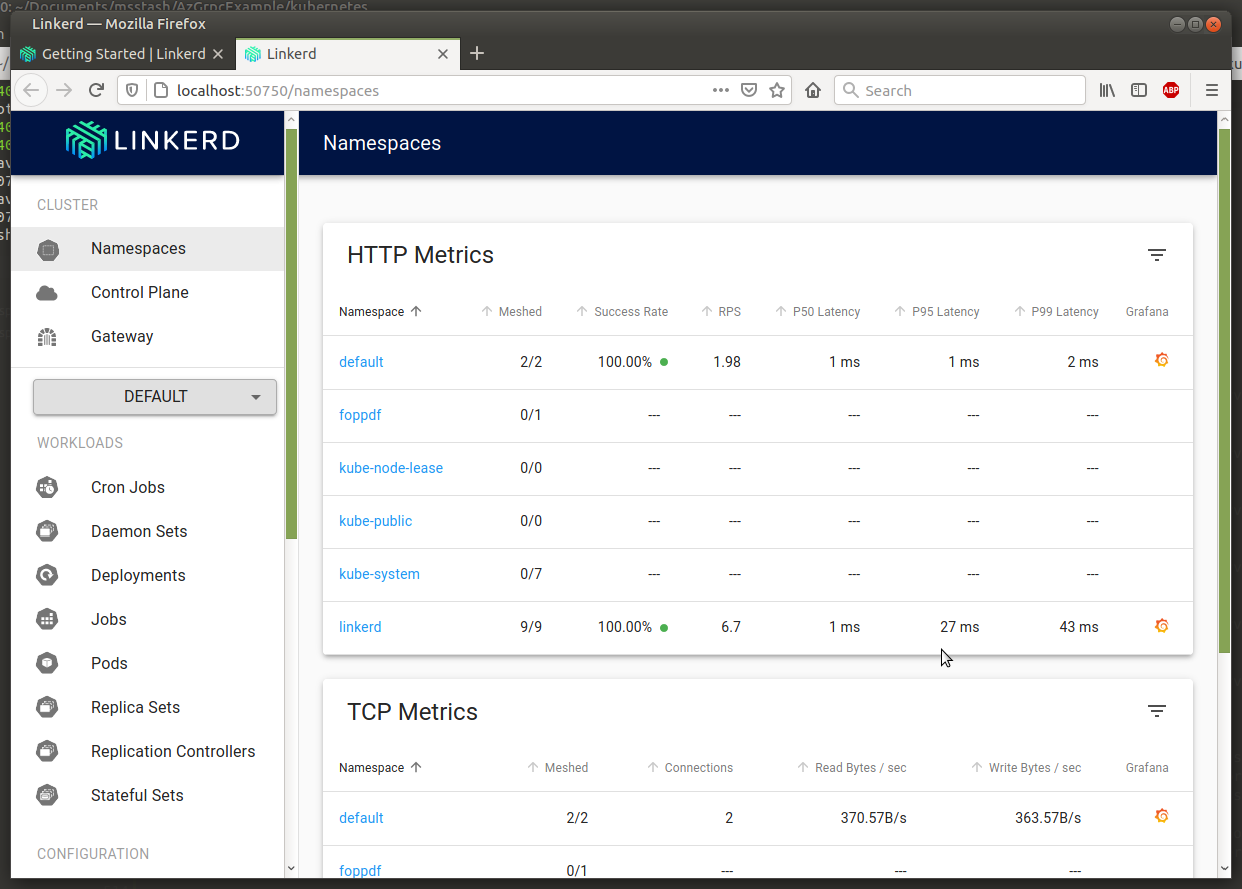
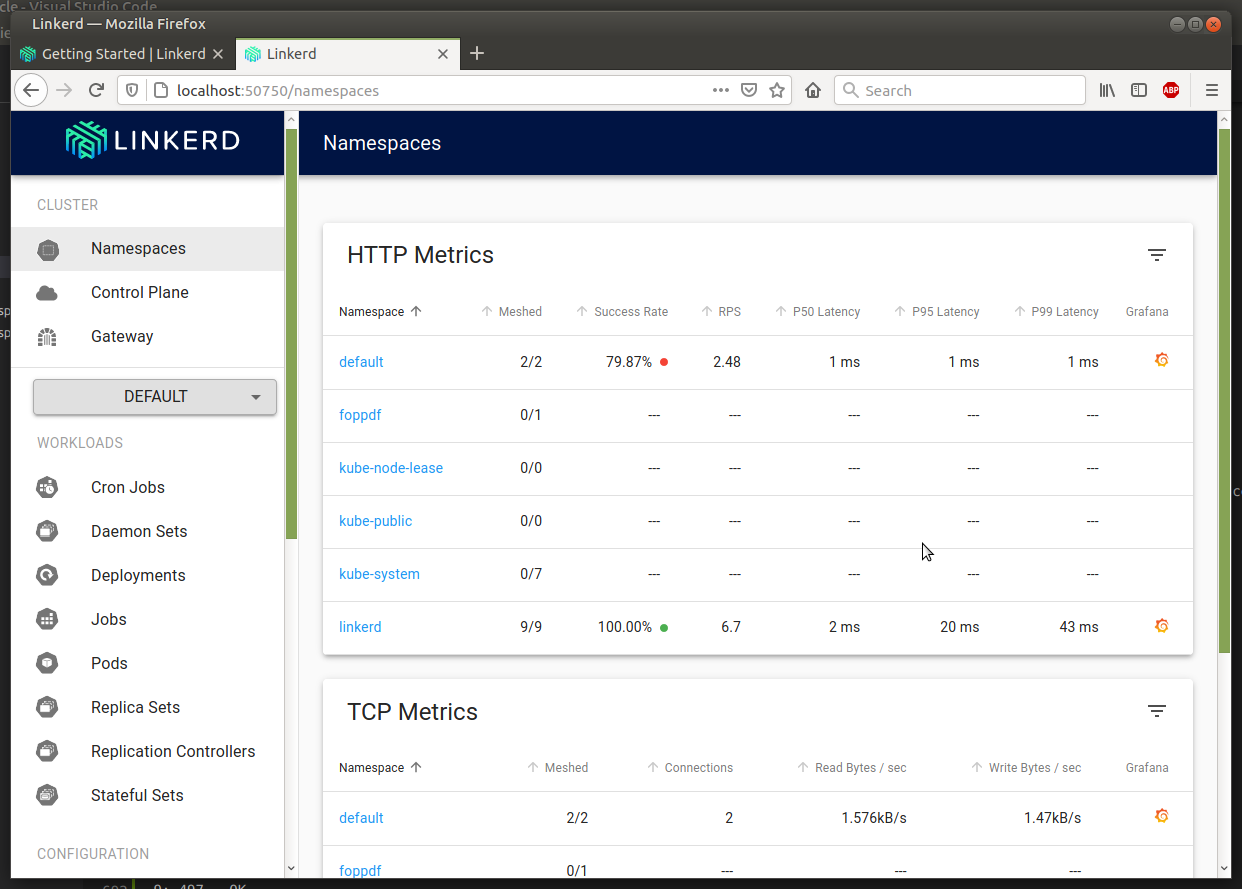
Andando nel namespace da me utilizzato - default - avrò i dettagli dei miei pod:
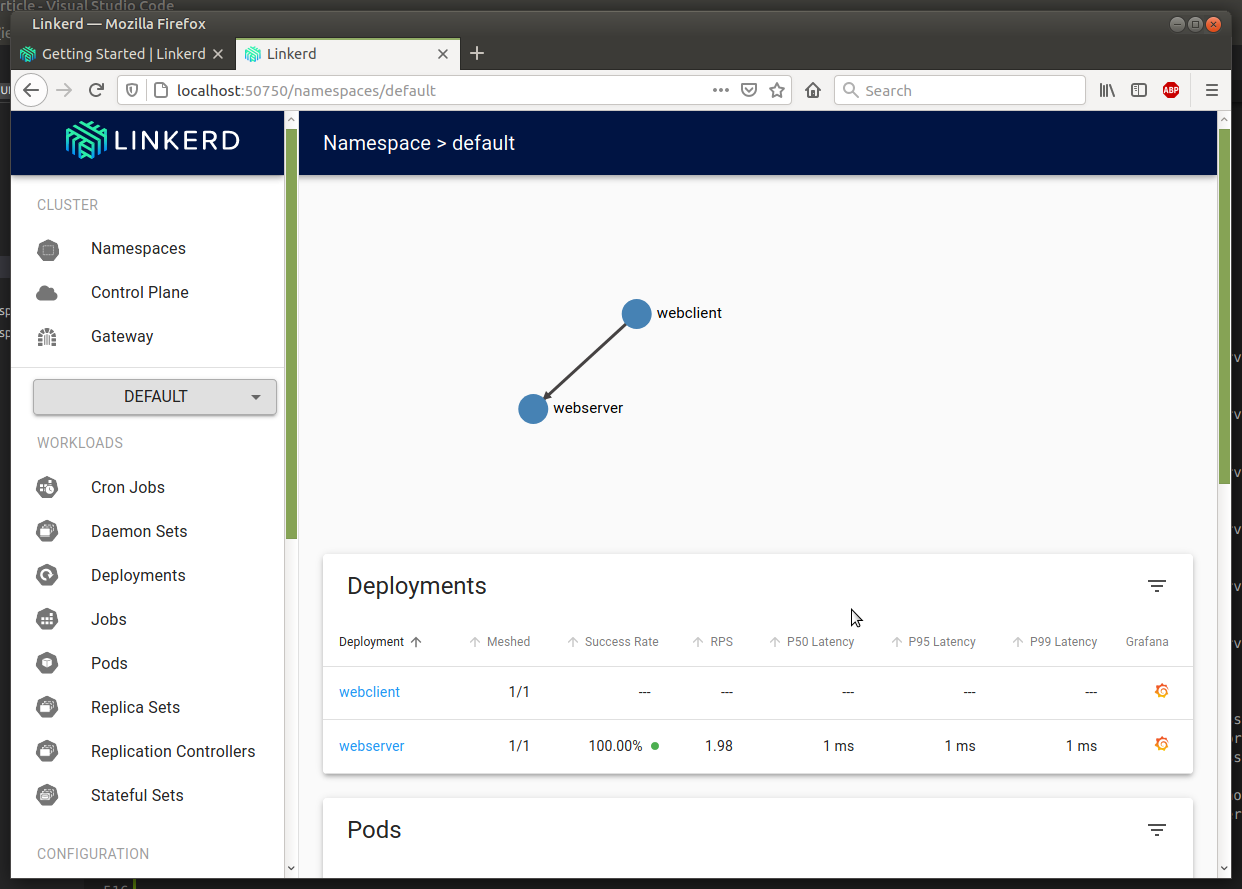
E su tutte le loro connessioni:
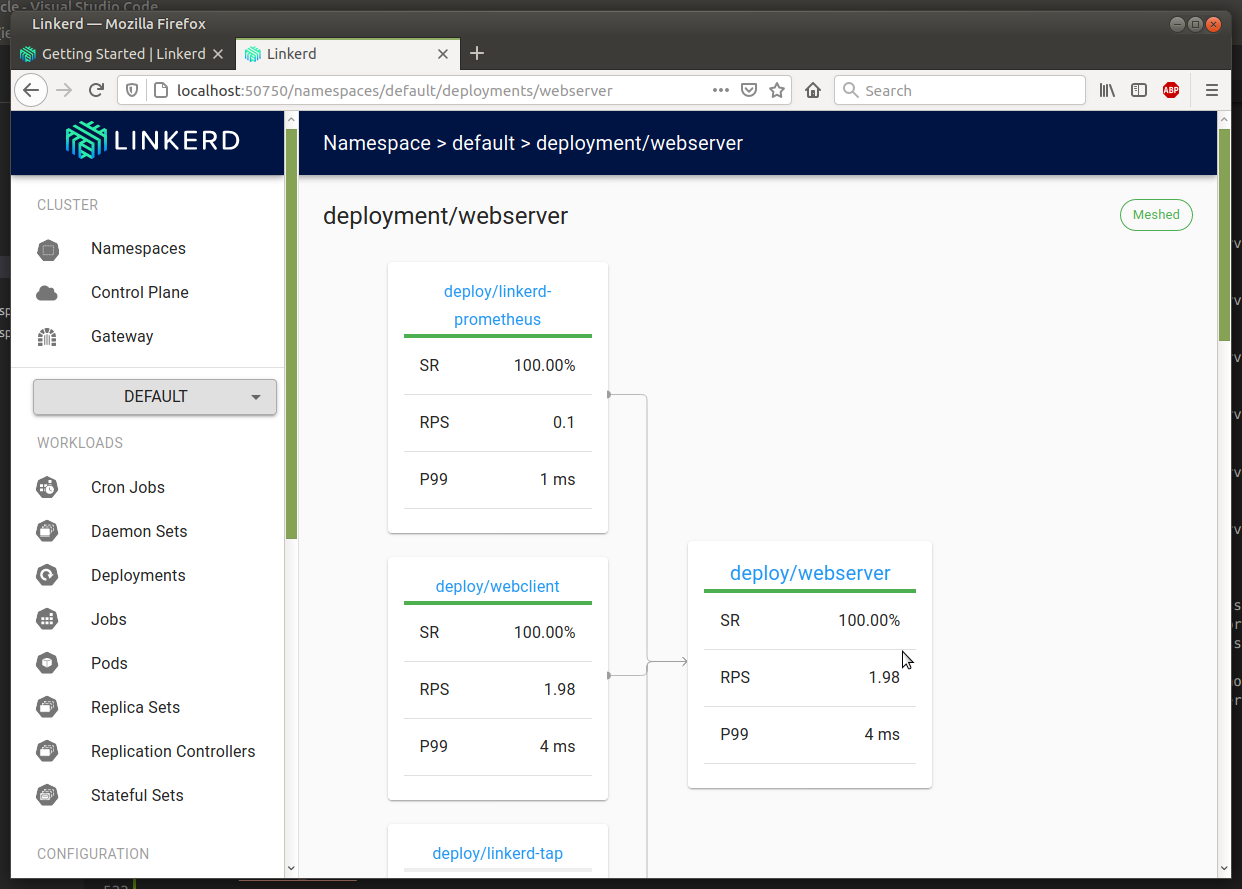
E' possibile vedere molte altre informazioni, come anche usare i comandi, come il tap usato prima, direttamente da console. Inoltre aggiunge anche Grafana per avere report dettagliati:
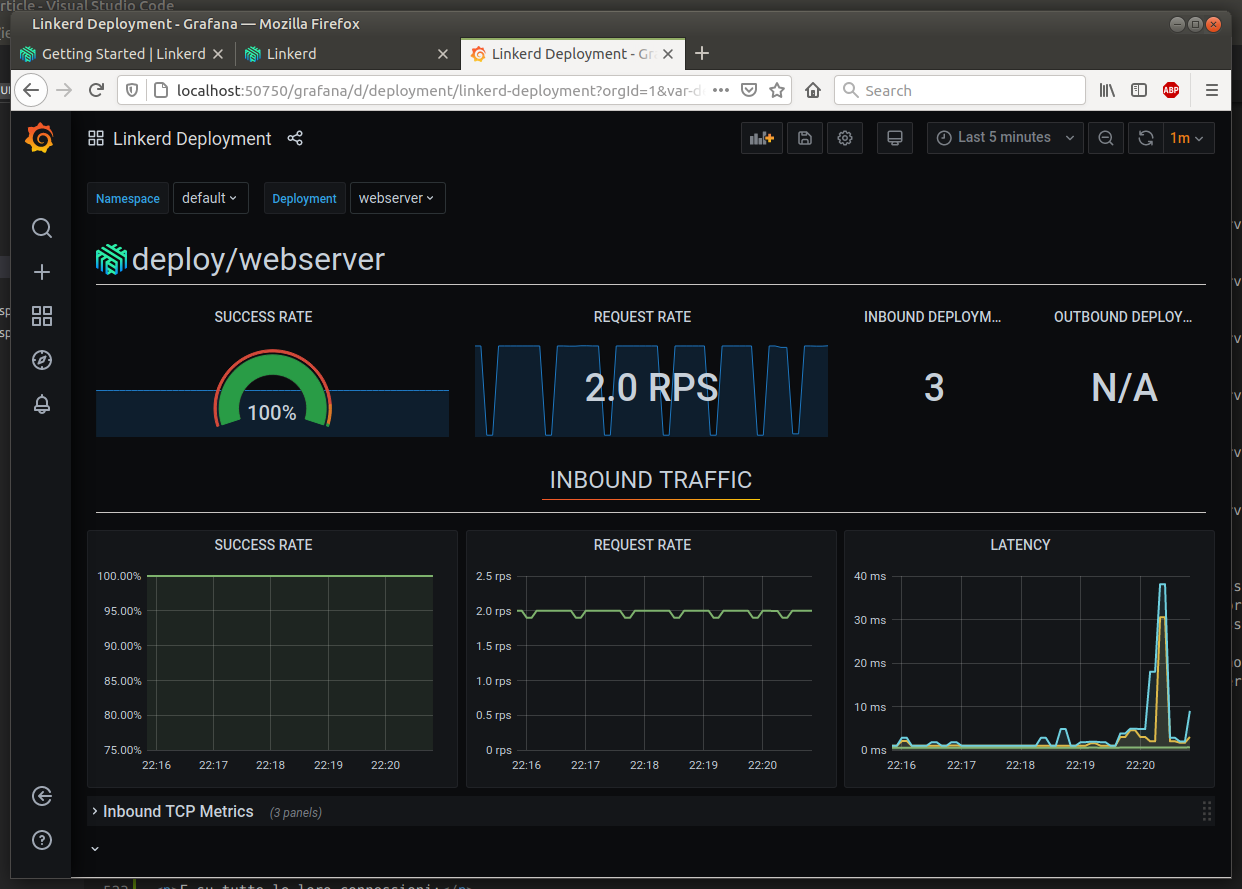
C'è una feature interessante in Linkerd che però non è utilizzare con connessioni gRPC, il retry. Questa funzionalità permette, in caso di problemi di connessione o di errore del service, di ripetere in automatico la chiamata in modo trasparente dal client. Vediamolo velocemente visto che ho creato anche un service API REST per testare questo.
---
apiVersion: v1
kind: Service
metadata:
  name: httpserver
  annotations:
    linkerd.io/inject: enabled
spec:
  selector:
    app: httpserver
  ports:
  - protocol: TCP
    port: 80
    targetPort: 80
---
apiVersion: apps/v1
kind: Deployment
metadata:
  name: httpserver
  labels:
    app: httpserver
spec:
  replicas: 1
  selector:
    matchLabels:
      app: httpserver
  template:
    metadata:
      labels:
        app: httpserver
      annotations:
        linkerd.io/inject: enabled
    spec:
      containers:
      - name: webserver
        image: sbraer/httpservice:v1
        imagePullPolicy: IfNotPresent
        env:
        - name: RANDOM_ERROR
          value: "true"
E' presente la environment variable RANDOM_ERROR per simulare un errore generico: su cinque richieste una restituirà l'errore HTTP 500. Lo avvio nel mio cluster:
$ kubectl apply -f server_http.yaml
service/httpserver created
deployment.apps/httpserver created
$ kubectl logs httpserver-56b558996c-67s9h
error: a container name must be specified for pod httpserver-56b558996c-67s9h, choose one of: [webserver linkerd-proxy] or one of the init containers: [linkerd-init]
$ kubectl logs httpserver-56b558996c-67s9h webserver
info: Microsoft.Hosting.Lifetime[0]
      Now listening on: http://[::]:80
info: Microsoft.Hosting.Lifetime[0]
      Application started. Press Ctrl+C to shut down.
info: Microsoft.Hosting.Lifetime[0]
      Hosting environment: Production
info: Microsoft.Hosting.Lifetime[0]
      Content root path: /app
Controllando con il log questo http service funziona correttamente. Ora il client:
apiVersion: apps/v1
kind: Deployment
metadata:
  name: httpclient
  labels:
    app: httpclient
spec:
  replicas: 1
  selector:
    matchLabels:
      app: httpclient
  template:
    metadata:
      labels:
        app: httpclient
      annotations:
        linkerd.io/inject: enabled
    spec:
      containers:
      - name: httpclient
        image: sbraer/httpclient:v1
        imagePullPolicy: IfNotPresent
        env:
        - name: SERVER_NAME
          value: "http://httpserver/weatherforecast"
E il log:
$ kubectl apply -f client_http.yaml
deployment.apps/httpclient created
$ kubectl get po
NAME                          READY   STATUS    RESTARTS   AGE
httpclient-774fdcfbd7-kqcjz   2/2     Running   0          8s
httpserver-56b558996c-67s9h   2/2     Running   0          5m8s
$ kubectl logs httpclient-774fdcfbd7-kqcjz
error: a container name must be specified for pod httpclient-774fdcfbd7-kqcjz, choose one of: [httpclient linkerd-proxy] or one of the init containers: [linkerd-init]
$ kubectl logs httpclient-774fdcfbd7-kqcjz httpclient
serverName = http://httpserver/weatherforecast
0: The remote server returned an error: (500) Internal Server Error. - ERROR
1: 507 - OK
2: 500 - OK
3: 500 - OK
4: 504 - OK
5: The remote server returned an error: (500) Internal Server Error. - ERROR
6: 506 - OK
7: 500 - OK
8: 489 - OK
9: 503 - OK
10: The remote server returned an error: (500) Internal Server Error. - ERROR
11: 513 - OK
12: 508 - OK
13: 501 - OK
14: 502 - OK
15: The remote server returned an error: (500) Internal Server Error. - ERROR
16: 498 - OK
17: 499 - OK
18: 507 - OK
19: 502 - OK
Come previsto, ogni cinque chiamate una ritorna errore. Questa cosa è visibile anche dalla console e questo fa emergere immediatamente il problema:
Per attivare la funzionalità di retry di Linkerd:
apiVersion: linkerd.io/v1alpha2
kind: ServiceProfile
metadata:
  name: httpserver.default.svc.cluster.local
  namespace: default
spec:
  routes:
  - condition:
      method: GET
      pathRegex: /.*
    name: GET ALL
    isRetryable: true
Questa è la versione minimale della configurazione del retry. In name nel metadata ho inserito il dns name completo del service, e in routes si può specificare i singoli path e method per abilitare o meno il retry. Lo avvio:
$ kubectl apply -f server_http_retry.yaml
serviceprofile.linkerd.io/httpserver.default.svc.cluster.local created
$ kubectl get ServiceProfile
NAME                                   AGE
httpserver.default.svc.cluster.local   18s
$ kubectl apply -f client_http.yaml
deployment.apps/httpclient created
$ kubectl logs httpclient-774fdcfbd7-h22vx httpclient
serverName = http://httpserver/weatherforecast
0: 492 - OK
1: 502 - OK
2: 503 - OK
3: 493 - OK
4: 503 - OK
5: 496 - OK
6: 500 - OK
7: 506 - OK
8: 501 - OK
9: 497 - OK
10: 498 - OK
11: 510 - OK
12: 494 - OK
13: 498 - OK
14: 504 - OK
15: 504 - OK
16: 500 - OK
17: 498 - OK
18: 502 - OK
Ora al client le connessioni rispondono sempre correttamente grazie al retry autimatico di Linkerd. Con il comando linkerd routes si possono avere altri dettagli:
$ linkerd routes deploy/httpclient --to deploy/httpserver -o wide
ROUTE          SERVICE   EFFECTIVE_SUCCESS   EFFECTIVE_RPS   ACTUAL_SUCCESS   ACTUAL_RPS   LATENCY_P50   LATENCY_P95   LATENCY_P99
GET ALL     httpserver             100.00%          2.0rps           80.00%       2.5rps           1ms           3ms           4ms
[DEFAULT]   httpserver                   -               -                -            -             -             -             -
Le due colonne EFFECTIVE SUCCESS e ACTUAL SUCCES mostrano le informazioni previste. Ma ecco la nota negativa: purtroppo con le connessioni gRPC il retry non funziona (o sono io incapace di configurarlo, accetto consigli). A parte questo, fantastico tutto questo? Sì, ma con molta attenzione, perché solo alcune operazioni possono essere ripetute in moto automatico senza rischiare di corrompere i dati (in inglese API idempotency): un update, un delete o una select, anche se ripetuti, non rischiano di corrompere eventuali dati trattati, mentre un insert, se ripetuto per errore da Linkerd (in caso di timeout della richiesta, per esempio) comporterebbe l'inserimento di un doppio record.
E' ora di chiudere. Non ho aggiunto molte info per Linkerd perché le guide sul sito ufficiale sono molto esaustive. E, ovviamente, non ho voluto sbilanciarmi sulla mia preferenza tra queste due soluzioni. Infine, qui il codice sorgente delle quattro applicazioni, i file dei certificati creati e i file per Kubernetes.
Per inserire un commento, devi avere un account.
Fai il login e torna a questa pagina, oppure registrati alla nostra community.
- C# e Net 6 in Kubernetes con Prometheus e Grafana, il 12 gennaio 2022 alle 21:58
- Snaturare Kubernetes evitando i custom container Docker, il 6 gennaio 2022 alle 19:40
- Provando Kaniko in Kubernetes come alternativa a Docker per la creazione di immagini, il 18 dicembre 2021 alle 20:11
- Divertissement con l'OpenID e Access Token, il 6 dicembre 2021 alle 20:05
- Operator per Kubernetes in C# e Net Core 6., il 28 novembre 2021 alle 19:44
- RBAC in Kubernetes verso gli operator, il 21 novembre 2021 alle 20:52
